The Bowflex T10 is a low-maintenance machine, but sometimes the walking belt may slip or loses its grip. This can be due to issues with belt tension or alignment, which can be easily fixed using the tension bolts at the back of the machine. Maintaining proper belt tension and alignment is crucial for optimal performance and safety.

Adjusting the Belt tension on Bowflex T10
The Bowflex T10 is a low-maintenance machine but it is possible that the walking belt starts to slip during use. This problem can be easily corrected by adjusting the belt tension via the tension bolts located at the rear of the machine.
Here are the steps:
- Unplug the power cord and wait 5 minutes before performing any cleaning, maintenance, or repairs on the machine. Store the power cord securely. Also, turn the power switch off and remove the Safety Key and keep it in a secure place.
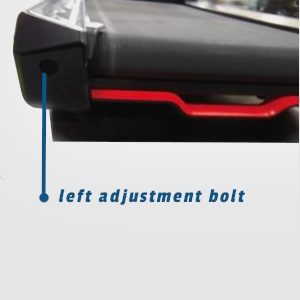
- Take out the plugs from the back cover to reveal the alignment bolts that you need to adjust.
- Turn the right and left belt bolts 1/2 turn clockwise using a 6mm hex wrench, one at a time.
- Check the walking belt’s tension by measuring its midpoint. Grab the belt at its midpoint and lift it upward, then measure the distance to the deck. If the distance is more than 1 inch, the belt is still loose. Repeat the adjustment if necessary. If one side has more tension than the other, you will need to adjust only one bolt. . If you turn one side more than the other, the belt will move away from that side.
- Excessive tension on the belt leads to excessive friction, causing wear and tear on the belt, motor, and electronics, so follow the one-inch rule for correct tension.
How to Align the Walking Belt on Bowflex T10
Your running style and uneven surfaces can make the belt misaligned. If the walking belt is not centered, it is very easy to fix. You will just need to give a little tweak to the 2 bolts at the back of the treadmill and you’ll be good to go.
Here are the steps to align the walking belt of the T10 treadmill:
- Aligning the belt requires operating the treadmill it so avoid touching the walking belt and stepping on the power cord. Keep others, especially children, at a safe distance from the device during the alignment process.
- Take out the plugs from the back cover to reveal the alignment bolts that you need to adjust.
- Press the START button to activate the walking belt.
- Stand at the back of the treadmill to observe the belt’s movement direction.
- If the belt moves left, adjust by turning the left bolt 1/4 turn clockwise and the right bolt 1/4 turn counterclockwise. If the belt moves right, turn the left bolt 1/4 turn counterclockwise and the right bolt 1/4 turn clockwise.
- Keep an eye on the belt’s movement for about 2 minutes. Repeat making small adjustments to the bolts until the walking belt is centered.
- Hit PAUSE/STOP twice to stop the treadmill and finish the alignment.


